Hummingbird Studios: Mixed Media Fine Art mixed with the Fine Art of Life…

Posts tagged ‘hummingbird studios’

Frugal Tips E-book

Check this out for some GREAT frugal tips!

http://janfoxdesigns.com/frugart.pdf

Completion of Mosaic Series (for now!)

Happy New Year!

This is a Commission I did my latest phase of mosaics and the client loved it. It was on the theme of Dreams and I think I captured the idea he wanted pretty well. And it was a nice completion to a fun series.

mosaic 3

For the full three in the Series Look Below….

Overcoming my fear of Drawing Faces

Friends, please support and share my creative work + help get it displayed on a massive billboard in Times Square NYC:

http://windykai.see.me/

Use the ‘Support’ button at the top of my profile before December 12th, share with your friends + you might win yourself a 7-day dream vacation! 🙂 Thanks!!

___________________________________________________________________________________________________

SOOO, as you’ll see in my previous post I have a long standing fear of face drawing and painting.  Well, recently I started a grid project to help me get over this fear.  It’s turning out actually quite well and curing my fear of faces!  the grid system works great to get you off your feet and flying!  Here are the results!

audrey 1

audrey 2

audrey 3

audrey 4

audrey 5

So here I am, the ultimate frady cat when it comes to drawing faces and look what I’ve achieved as just a class project along with my students.  I surprised myself….maybe you’ll surprise YOU!!

Comment below to let me know about your biggest artistic fear and how you overcame it….and pictures are always nice!!!

Don’t forget to visit me on Facebook and Like Hummingbird Studios Page and follow us on Twitter OR sign up for our newsletter to your right. You’ll get a free GEL transfer technique and Monthly updates and tutorials from Hummingbird Studios.
Love and Light….WK

Ft. Worth Art Show with Paragon Shows, Some GREAT Artists & a Frugal Art Fair Tip!!!

Hi and good morning!  Hope all is well on your end….I had a show this weekend with Paragon Shows in Ft. Worth.  First of all I must say, out of all the shows I’ve done, this was by far the most talented group of artists I’ve ever come across!  There were some amazing folks!  So I’m going to give you a list for some eye candy!

  • www.jimmyMcDonald.com

  • www.mcarlawright.com

  • www.Gavynskystudios.com

  • www.wlwilkerson.com

  • www.teresahowley.com

  • www.stewartreinphotography.com

  • (My Fav!)  www.artid.com/efstudio

  • (A Fan that stopped by)  www.robinsongart.com

  • (Traded a painting for a GREAT bracelet) www.dwyerdesigns.com

    Now, after showing what talent was available, it was a shame that the weather and location did not do us any favors.  There was a lot a GREAT art, some great organization by Bill Kinney with Paragon, just not a lot of traffic.  The weather kept people away and we just weren’t in a very visible location, so needless to say it wasn’t our best show or anyone’s best show for that matter, but I was very lucky to have some very talented artists come by and “critique” my work and give me some inspiration for new directions!  See my next post for my newest piece beginnings!

    ____________________________________________________________________

    Now I never leave a show without a frugal tip from an artist.  Stewart Rein (website above) was next to us and said that he used to travel with propanels but that he began to travel alone and just needed to downsize both weight and size wise.  But he wanted his booth to “appear” bigger, so he created these great panels the “V” out on each side creating a larger look for his booth…here are the panels created with PVC Pipe and a “pillow case” that is slipped over them.  EASY AS PIE and created a larger tent look!


    Now for a NOT SO FRUGAL very cool idea….one painter M. Carla (website above) stored and transported her paintings in this GREAT Crate that she had made for her.  My husband got inspired and it starting a very small version for me!  I’m so so lucky! 

    Don’t forget to visit me on Facebook and Like Hummingbird Studios Page and follow us on Twitter OR sign up for our newsletter to your right. You’ll get a free GEL transfer technique and Monthly updates and tutorials from Hummingbird Studios.
    Love and Light….WK

    Stay tuned for my newest piece step by step!!
8 Ink-Jet Image Transfer Experiments


Happy Football Sunday Morning to you!  Well, I’ve always been fascinated with image transfers in my work and the amazing work of others and the results I see others getting….not that I haven’t gotten some great and very cool results myself, but I’m always looking for more…especially with Ink Jet Prints since that’s what I work with….so I downloaded from Cloth Paper Scissors the following free tutorial on Ink Jet Transfers….

How-To-Make-An-ImageTransfer

This is what I came up with….with much experimentation….and yet although I’m coming up with some great stuff, they are of course NEVER exactly like what the papers and tutorials claim to do…..but I guess that’s what MORE experimentation is for!

Here’s the orignial image I worked with on 60 lb press watercolor paper and here are my results….

  • The first I tried was Sheer Heaven which is supposed to be the “be all end all” of all transfer paper…..


Well, as you can see my results we less than “Heavenly”.  Now admittedly I only experimented around six or seven times with small images, but I just never came up with the smooth perfect image that they do.  You print on the rough side of the paper, mist alcohol on the image and burnish lightly.  It is supposed to lift perfectly into an exact replica of the original.  I didn’t get this result, but I have high hopes and plan to keep experimenting.  Now this paper is $24.00 with shipping for ten pieces, so I won’t be doing A LOT of experimenting freely, it’s just too expensive, but who knows maybe I’ll figure it out and love it as much as everyone else does.  If YOU know the secret to this paper I would LOVE to hear from you!!  Please comment and let me know your thoughts.  I do love the result, it’s just not what they claim.

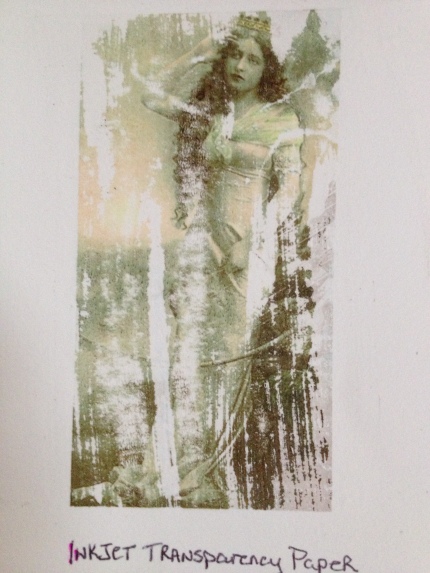
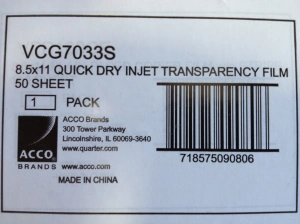
  • Next I tried using Inkjet Transparency paper over Matte Gel to transfer the image. Now you’re supposed to look for the “Non-Quick Dry” But I couldn’t for the life of me find anything but Quick Dry…so you have to move fast.  These were the results I got.

    So the instructions are to put down a light layer of gel medium and lay the printed side (rough side of the transparency) down on the gel then burnish.  You do have to move quick with the quick dry, but I actually loved the result.  It was one of my favorites.

  • Third I used Glossy photo paper with gel medium using the same process

So this image was created by printing on Glossy photo paper, putting down a light layer of gel medium then burnishing.  The next step involved spritzing with water and using a sponge to peel off the paper backing leaving only the “gloss” layer with the image left on your paper.  I also loved this effect.  It came out great for simple cheap glossy photo paper.

  • So Next I tried a transfer with Matte Photo paper.  I was also happy with this one.  Not a clean transfer and needs more experimentation but it came out pretty cool.


I took the matte paper with the image fresh off the printer.  With Matte laid down on the paper I put the image face down and burnished.  Now because of the backing of the paper you can’t spritz with water and peel off the back of the paper so you have to burnish (I used a bone folder on all of these) then just gently pull of the paper.  It leaves a nice partial image that I think would look great on  canvas.  This is another one that I was very happy with and look forward to playing with it some more.

  • The fifth image came quite by surprise and was just a ghost image, but very cool none the less,,,,


Using the glossy photo paper image I spritz the paper surface (substrate) with water and simply put the image down and burnished with the bone folder.  I got a nice ghost image while trying to achieve something completely different.  It was a nice surprise. 

  • The sixth image is by far my favorite.  I bought typical iron on paper from Office Depot that is used for ironing on fabric and t-shirts.

The next transfer you’ll see the traditional use of this paper, but I thought….I don’t keep an iron in my studio…let’s play with the heat gun and sure enough, just using my embossing heat gun I cut out the image and heating the paper with image face down of course, an almost perfect image appeared.  Then I went over the image with gel medium because it didn’t quite adhere all the way due to the lack of pressure from the iron.  I was thrilled with this option.  TRY IT!  Just be careful not to burn the back of the paper.  You need a lot less heat and time with the gun than you think.

  • Of course the next one is the traditional iron-on use of the iron-on paper.  Using an iron I got a pristine perfect image.  The problem is we can’t always use an iron on our canvases so that’s why I love the heat gun above, but if you’re working on a flat surface and in a journal, this works great.

  • Finally by pure accident I was doing the matte photo paper transfer to get our 8th image, using only water the spritz on the paper then laying the image face down on the paper and using water and a sponge returned the back of the paper leaving only the image.  Well after it dried I was surprised to be able actually pick the image up off the paper leaving me with a pure transfer that looks like this…..

Now to be honest I was unable to repeat this transfer with the photo of our lady above,  I tried and the paper kept falling apart, but I’m going to keep working at it because it’s just a great transfer.  I’m going to try with both the glossy and the matte photo paper again until I can repeat it.  It’s just too good of a transfer to give up on.  This one has been adhered to a canvas I’m working on and below you’ll see how I’ve used some of these techniques in an UNFINISHED (so be gentle, it’s in process 🙂 piece I’m working on.

  Flipped matte photo image

 Non Flipped Photo paper image

 Iron on paper with Heat Gun

 Ink Jet Quick Dry Transparency burnished on with gel Medium

This is the work so far, just playing around with these images and I’m excited to finish up and see how it turns out!


As always…..I want to hear from you!  What are your experiences with Ink-Jet transfers?  Or ANY transfers for that matter!  Let me know what you think of the PDF from Cloth paper Scissors,  Let’s see pics of any transfers you try from this tutorial.  COMMENT, COMMENT, COMMENT!  I LOVE new ideas.  So let’s hear them!  Try these transfers and get back to me!

Don’t forget to visit me on Facebook and Like Hummingbird Studios Page and follow us on Twitter OR sign up for our newsletter to your right. You’ll get a free GEL transfer technique and Monthly updates and tutorials from Hummingbird Studios.
Love and Light….WK

New piece finished!

Vineyard Tree


New Coasters with my Artwork on them! Plus a “dictionary bowl”!!!

WOW, WOW, WOW!  We ordered stone coasters with cork bottoms with my artwork on them to sell at my shows….we could NEVER have imagined how GREAT they would turn out!!  Here’s what will be available at my next three shows!!

We have Janet Greene To thank for these amazing pieces!

Here’s Janet’s info, so give her site a look!!

_____________________________________________________________________________________________________

And just for fun, in my student’s class we are making magazine bowls…..I chose to use dictionary pages rolled up to create this bowl….stay tuned for step by step instructions on how to make this bowl.  I’ll have pics and directions up soon…it’s a lot of fun!

Isn’t it fun???

As always…..Stay in touch and don’t forget to visit me on Facebook and Like Hummingbird Studios Page and follow us on Twitter OR sign up for our newsletter to your right. You’ll get a free transfer technique and Monthly updates and tutorials from Hummingbird Studios.

Love and Light….WK

New Piece: Step by Step continued….

Hi all…hope your fall is going well…the holidays will be upon us soon!!  Well, my new piece is coming along nicely and I hope to get it finished in time for my next show.  We’ll see how the muses work!  But here are the latest photos and the progress made….I’ll include from the beginning so we can see how things have progressed fully…

I’m very anxious to finish up with lots of details….we’ll see if my hand is steady enough!

Stay in touch and don’t forget to visit me on Facebook and Like Hummingbird Studios Page and follow us on Twitter OR sign up for our newsletter to your right. You’ll get a free transfer technique and Monthly updates and tutorials from Hummingbird Studios.

Love and Light as Always…..WK

Great Show and New Frugal Tips!

Hi all,  I just returned from a great little show in Georgetown TX and had a super time!

Made some great sales but most of all I got some great tips from a New Artist that was only on his second show!  So it just goes to show that we can always learn and share (or steal) 🙂  ideas from each other no matter how long we’ve been at this game!

____________________________________________

First of all Jim at www.jshepardstudios.com showed me http://www.qrstuff.com/  The newest gadget app that’s hitting the “phone world”  You can create a code for your own website so that buyers with the QR App downloaded to their phone can scan the code and it will take them directly to your website!  There’s also much more you can do if you explore the site!

So download a FREE QR Reader App on your phone and scan the code below:

IT WILL TAKE YOU DIRECTLY TO MY WEBSITE!

What a great tool to have on display at your booth so folks don’t have to remember your site….they can go directly to it!  It’s the new “wave” and you’ll start seeing these codes everywhere, if you haven’t already.  So jump on in and create your own code for your buyers, for FREE!

_______________________________________________

Finally Jim had a great storage idea that he used in his tent.  He had his pro-panels set up as below…..

But secretly behind it he had created a bin for storage using only cardboard and matching carpet from Home Depot to hide the “junk” from view of buyers.  See Below….

WHAT A GREAT IDEA JIM!  THANKS!!

So all in all with sales, time with my husband, meeting new people like Jim and getting these great frugal ideas, it was a super successful weekend!

_____________________________________

If you’d like to see us in person we’ll be at the following locations coming up in October and November!

Show Dates: 10/26/12 – 10/28/12

Hope to see you there!!

Don’t forget to visit me on Facebook and Like Hummingbird Studios Page and follow us on Twitter OR sign up for our newsletter to your right. You’ll get a free transfer technique and Monthly updates and tutorials from Hummingbird Studios.

Love and Light as Always…..WK

New piece Step by Step….Continued….

Well, the piece I started is coming along nicely.  I only wish I had more time to work on it.  I’m not sure it’ll be ready for my October Shows…..but I don’t want to rush it, so it may début in November and I’m fine with that….I’m loving the cool colors of blues and greens and purples and finding the different shades for the collage portion of the circles….I painted underneath and I love the color peaking up beneath the collage….this was such a flash of vision in my head that I’m very interested to see if it turns out in reality the way it flashed in my head!!!  So here’s what I’ve been doing….

In addition my students are in the process of recreating Starry Night on an extremely large canvas square by square with each student drawing a random square and recreating it on the canvas.  Below are the results as of now…I can’t wait to see the end.  They are SO talented!!

I look forward to comments……Don’t be afraid, let’s hear them!!!  Also, Don’t forget to visit me on Facebook and Like Hummingbird Studios Page and follow us on Twitter OR sign up for our newsletter to your right. You’ll get a free transfer technique and Monthly updates and tutorials from Hummingbird Studios.

As always, love and light from WK